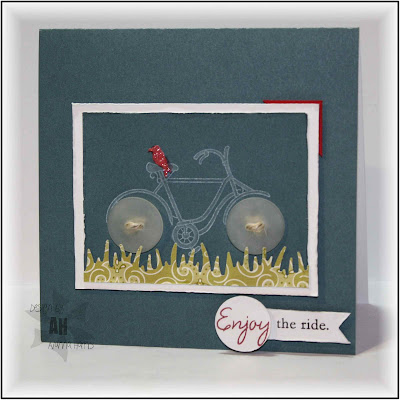
I have been wanting to try a Moxie Fab Challenge for a while. I got this card done for the current challenge, "I Want to Ride My Bicycle Challenge in the Moxie Fab World" on the last day!
Supplies:
Paper: A muse (eucalyptus & green madeira), PTI white, SU real red
Stamps: PTI (everyday button bits), A muse (tiny bird)
Ink: Palette hybrid moulin rouge, new canvas & noir
Accessories: frosted buttons (unknown source), hemp twine (dollar store), pop dots, SU 3/4" circle punch, MS grass punch, white prismacolour pencil, atyou Spica glitter pen (red)
I stamped the bike in white ink on Eucalyptus, one of Amuse's gorgeous new papers and coloured it in with a white pencil crayon. I chose frosted buttons to go with the white bike and threaded them with a teeny bit of twine so that they weren't naked. The bike was grounded with grass. I perched the tiny bird on the seat for a hit of colour...it was stamped in red and coloured over with red glitter pen, then cut out and popped up a bit. I have fat fingers, so this was one seriously challenging fussy cut!! I framed the scene in white and popped it up on the eucalyptus base. I love how the sentiment turned out...the "Enjoy" circle echoes the bike tires and provides a second hit of red. Once this was all assembled, I added a teeny corner of red to the bike scene to make a third spot of red...
I am in love with that red Tiny Bird!!
Monday, June 28, 2010
The Last Minute...
Clean, Simple & Colourful...
This week's CAS challenge on SCS is a colour challenge - bashful blue, certainly celery & orange. I used Joan's new technique and stamped the Marigold onto orange cardstock then blended in different shades with my copics. I fussy cut the Marigold, glued it to a blue layer and fussy cut that again to make a shadow. I stamped leaves on my base, rounded & distressed the edges and added the sentiment. To finish the flower off, I coloured the shaded parts with a glitter pen and added the pearl in the centre. These were fun colours for a card...hope you can make something with them too!!
Supplies:
Paper: SU very vanilla, pumpkin pie, bashful blue
Ink: SU certainly celery, Palette hybrid burnt umber, PTI tea dye
Stamps: A muse (marigold, leaf frond, leaf frond II, hello)
Accessories: atyou Spica glitter pen, A muse pearl, pop dots, copics, corner chomper
Supplies:
Paper: SU very vanilla, pumpkin pie, bashful blue
Ink: SU certainly celery, Palette hybrid burnt umber, PTI tea dye
Stamps: A muse (marigold, leaf frond, leaf frond II, hello)
Accessories: atyou Spica glitter pen, A muse pearl, pop dots, copics, corner chomper
Wednesday, June 23, 2010
Smile...
I made this card a few weeks ago and am finally posting it now...I love the little camera in A muse's vintage clear set! I stamped it in 3 different colours, fussy cut them, and spent the better part of 20 minutes threading them onto linen thread. Other than all that fussiness, it really is a simple card! I tucked the thread in between the yellow and black layer and popped the whole thing up on a vanilla base. Hope it makes you smile!
Supplies:
Paper: SU very vanilla, basic black, barely banana
Ink: Palette hybrid noir, SU (real red, glorious green & taken with teal)
Stamps: A muse
Accessories: SU linen thread, pop dots
Monday, June 21, 2010
A Sketch...
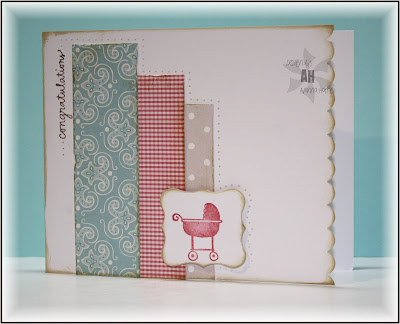
This week's CAS challenge on SCS is a sketch challenge inspired by Fionna51's gorgeous umbrella card. This is a card after my own heart...white base, 4/25" square AND piercing!
It seems like all the pregnant girls at work are having girls lately, so I grabbed some scraps (great sketch for scraps!!) in girly colours to make a baby card. I tried to make it a bit shabby chic, so the edges are all distressed and inked.
I played around with a larger piece of paper for the focal image, but decided to make it smaller to fit with the baby theme. I added the sentiment on the top left for a change...it seems like I always put in bottom right. I added a scalloped edge on the right for interest. I had to pierce, of course, to finish it off. Thanks for stopping by...hope you can play along with the challenge...
It seems like all the pregnant girls at work are having girls lately, so I grabbed some scraps (great sketch for scraps!!) in girly colours to make a baby card. I tried to make it a bit shabby chic, so the edges are all distressed and inked.
Supplies
Paper: PTI white, A muse patterned papers
Ink: Palette hybrid burnt umber, PTI tea dye, Colorbox Q's
Stamps: A muse
Accessories: pop dots, paper piercer, SU scallop edge punch
Friday, June 18, 2010
Not my style...
I don't do vintage...too fussy and froofy (is that a word?) for me. So when my Mom commissioned me to make a card for a Diamond Anniversary AND provided me with the stamp and the supplies she absolutely had to have on the card, I knew I had a challenge on my hands. I had one very pretty Hampton Arts stamp called "Walking down the aisle" and some dollar store bling to use. I had orders to make the card "sparkle like a diamond". Oh boy!
I stamped the bridal couple, coloured some key areas with my copics, glittered the veil, flowers and boutonniere and fussy cut the image. Everything was edged with tea dye ink. I added some strategic shiny flourishes and the "forever" sticker which I cut in two so it fit better on the layout. I finished the card off with some piercing along the bottom in the empty space. The card measures 5"x6". CAS meets vintage??? What do you think?
Supplies:
Paper: Stamping Bella
Stamps: Hampton Arts
Ink: Palette hybrid noir, PTI tea dye (chai & chamomile)
Accessories: copics, MS glitter, SU 2 way glue pen, foil embossed stickers from the dollar store, pop dots, paper piercer
I stamped the bridal couple, coloured some key areas with my copics, glittered the veil, flowers and boutonniere and fussy cut the image. Everything was edged with tea dye ink. I added some strategic shiny flourishes and the "forever" sticker which I cut in two so it fit better on the layout. I finished the card off with some piercing along the bottom in the empty space. The card measures 5"x6". CAS meets vintage??? What do you think?
Thursday, June 17, 2010
One Layer with a Flourish...
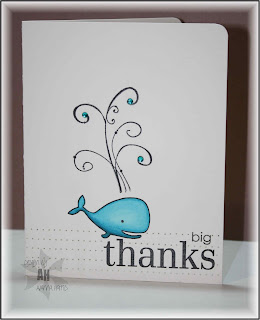
I've made my One Layer Wednesday card (on Thursday!)...I was making some thank you cards with Moby, the whale stamp from A muse, and piercing the spout on top of his head when I suddenly remembered Susan's challenge for the week to use a flourish on a OLC. I pulled out one of my first stamps sets, a flourish set from Autumn Leaves, and found the perfect-although-kind-of-large flourish for Moby.
I coloured Moby with copics and added some bling to his spout. Because the left side of the card seemed kind of empty, and because Moby looked like he was flying in the air rather than floating in water, I added a few lines of piercing to ground him in a very subtle way. I think it works!
Supplies:
Paper: Stamping Bella
Ink: palette hybrid noir
Stamps: A muse (moby, thanks), Autumn Leaves, PTI (piece of cake)
Accessories: A muse twinkle stickers, paper piercer, copics, corner chomper
I coloured Moby with copics and added some bling to his spout. Because the left side of the card seemed kind of empty, and because Moby looked like he was flying in the air rather than floating in water, I added a few lines of piercing to ground him in a very subtle way. I think it works!
Wednesday, June 16, 2010
Father's Day/Teacher Thank You Gift Card Holder Tutorial

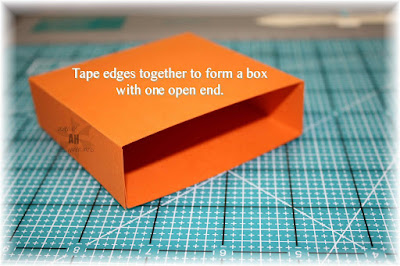
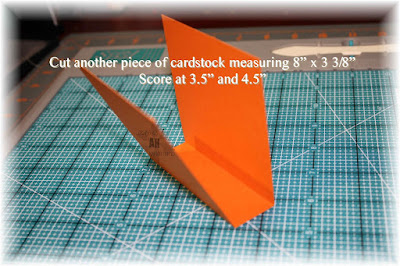
I, as per my usual habits, left making teacher's thank you gifts to the last minute again this year. Thankfully, the latest issue of Family Fun magazine arrived in the mail and a craft project in it inspired me! I adapted it from the Kraft Dinner box used in the magazine to one made from cardstock and I have a tutorial to show you how I did it. The great part about it is that it works for a teacher or for a dad!
 |
| Step One |
 |
| Step Two |
 |
| Step Three |
 |
| Step Four |
 |
| Step Five |
 | ||||
| Step Six |
Supplies:
Stamps: A muse (school time)
Ink: Palette hybrid noir
Paper: SU (pumpkin pie, basic grey, summer sun), A muse (lined paper)
Accessories: SU large star punch, MS apple punch, pop dots
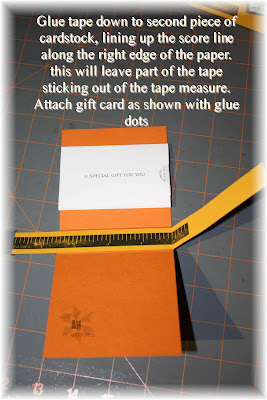
You can decorate the tape measure as you wish. I used stamps from A muse's School Time clear set - perfect for this project as it includes the ruler and the sentiment "You Rule". I added a bit of grey cs at the end of my tape measure so it looks like a real one.
Hope you like this project...it's quick if you're in a hurry to get something done - half an hour tops now that the measuring is all figured out for you!
Sunday, June 13, 2010
A "wow" day & a CAS card...
I spent the day colouring today...
I attended the Copic Certification course in T.O. with Sherrie Siemens. Let's just say I was doing it all wrong and now I am more in awe of copics than I was when I didn't really know what I was doing with them. The scary thing is that I am now looking at my 144 Ciaos knowing that I definitely don't have enough (gasp) colours!!! To sum the day up, all I can say is "wow"...and if you own copics, you should take the course if you get the chance.
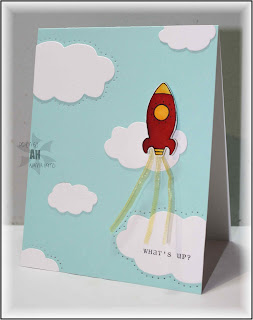
I stalked the CAS DT girls on SCS tonight knowing that tomorrow night will be busy and I wouldn't get a chance to make a card for the challenge. I am pretty sure that the theme is "Things that Fly". I grabbed one of my fave A muse stamps, Rocket, for this one.
I cut out two sets of the clouds and positioned them on the blue base, trimming the ends that hung over the edge. I pierced around 3 of the clouds to help them stand out just a bit more and to help the eye travel around the card. I coloured and cut out the rocket. The stamp has some fire coming from underneath the rocket but I had to cut the flames off as they are pretty thin lines that aren't attached to the rocket at all. In place of the flames, I coloured some cream organdy ribbon with a copic then cut the ribbon into 3 parts leaving it intact at one end. I taped this end underneath the rocket. Last of all, I added the sentiment to the bottom cloud. I like it...hope you do too! Don't forget to try out the challenge!
I attended the Copic Certification course in T.O. with Sherrie Siemens. Let's just say I was doing it all wrong and now I am more in awe of copics than I was when I didn't really know what I was doing with them. The scary thing is that I am now looking at my 144 Ciaos knowing that I definitely don't have enough (gasp) colours!!! To sum the day up, all I can say is "wow"...and if you own copics, you should take the course if you get the chance.
I stalked the CAS DT girls on SCS tonight knowing that tomorrow night will be busy and I wouldn't get a chance to make a card for the challenge. I am pretty sure that the theme is "Things that Fly". I grabbed one of my fave A muse stamps, Rocket, for this one.
Supplies:
Paper: A muse, PTI
Ink: Palette hybrid noir
Stamps: A muse
Accessories: copics, pop dots, SU ribbon, MFT cloud trio die, paper piercerI cut out two sets of the clouds and positioned them on the blue base, trimming the ends that hung over the edge. I pierced around 3 of the clouds to help them stand out just a bit more and to help the eye travel around the card. I coloured and cut out the rocket. The stamp has some fire coming from underneath the rocket but I had to cut the flames off as they are pretty thin lines that aren't attached to the rocket at all. In place of the flames, I coloured some cream organdy ribbon with a copic then cut the ribbon into 3 parts leaving it intact at one end. I taped this end underneath the rocket. Last of all, I added the sentiment to the bottom cloud. I like it...hope you do too! Don't forget to try out the challenge!
Friday, June 11, 2010
Wild Roses & Twinkles...
Here is a card I made using some new stamps from A muse...the lovely wild rose & wild rose branch.
I stamped the wild rose branch on the base after stamping it off first once on scrap paper. I stamped the wild rose on various colours of A muse cardstock (aren't the colours pretty?), punched them out and popped them up overtop the branch. I linked the three images together using tiny twinkle stickers. The sentiment fit perfectly on the bottom of the card with three more twinkle stickers below. I love love love how this turned out...hope you like it too!!
Supplies:
Paper: A muse
Ink: Palette hybrid noir
Stamps: A muse
Accessories: SU curly label punch, A muse twinkle stickers, pop dotsI stamped the wild rose branch on the base after stamping it off first once on scrap paper. I stamped the wild rose on various colours of A muse cardstock (aren't the colours pretty?), punched them out and popped them up overtop the branch. I linked the three images together using tiny twinkle stickers. The sentiment fit perfectly on the bottom of the card with three more twinkle stickers below. I love love love how this turned out...hope you like it too!!
Tuesday, June 8, 2010
More One Layer Cards...
Are you sick of them yet??? I am not! This month's A muse Lounge Challenge is called "Taking off some Layers" Isn't Jennie so clever with words?! I have been making OLCs like crazy and have 3 to show you!
This first one is so simple, but I had to hug myself after thinking of the idea. I was playing around with the new Vintage set from A muse and was using the sentiment "You make me smile" for another card. Being a clear stamp, you can bend it...and it goes perfectly into the shape of a smile! I tried various ideas for the eyes, the most scary looking being A muse's Sun stamp...it was the face of someone possessed!! In the end, I settled for blue buttons - more friendly!! I pierced a circle using a nestie as a circle template. Love those nesties!!
The second and third cards use the same layout and some of the newly released stamps from A muse - gorgeous, eh? Pretty self explanatory to make...
Hope you enjoy my trio of OLCs...tomorrow is Susan's One Layer Wednesday...why stop making these???
This first one is so simple, but I had to hug myself after thinking of the idea. I was playing around with the new Vintage set from A muse and was using the sentiment "You make me smile" for another card. Being a clear stamp, you can bend it...and it goes perfectly into the shape of a smile! I tried various ideas for the eyes, the most scary looking being A muse's Sun stamp...it was the face of someone possessed!! In the end, I settled for blue buttons - more friendly!! I pierced a circle using a nestie as a circle template. Love those nesties!!
Supplies:
Paper: SU very vanilla
Stamps: A muse
Ink: palette hybrid noir
Accessories: SEI buttons, circle nestibility, SU linen thread, paper piercer, corner chomper
The second and third cards use the same layout and some of the newly released stamps from A muse - gorgeous, eh? Pretty self explanatory to make...
Supplies:
Paper: A muse (wheat)
Ink: Palette hybrid moulin rouge, charcoal & noir
Stamps: A muse (Marigold, gossamer wings, many thanks)
Accessories: Making Memories brad, paper piercerSupplies:
Paper: A muse
Ink: SU (cool caribbean, not quite navy, certainly celery, always artichoke)
Stamps: A muse (wild rose branch, hello, gossamer wings)
Accessories: none!
Technique: rock & rollHope you enjoy my trio of OLCs...tomorrow is Susan's One Layer Wednesday...why stop making these???
Two roads...
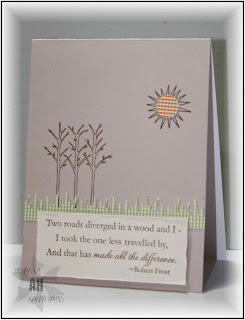
I love the poems of Robert Frost...and so I had to buy Lisa Strahl's stamp set "Motivational Centers" from Cornish Heritage Farms. This week's CAS challenge on SCS was to make a greeting the focal point of your card. I used part of Robert Frost's "The road not taken" as my focal point.
The rest of the card is kind of understated to allow more focus on the verse. I used A muse's new cardstock colour "wheat" for my base - it's an addictive colour!! I added a touch of gingham dp for the scene to give a bit of colour pop. I tried highlighting some of the words in the verse with colour, but I didn't like the look of it, so I changed it back to plain (ie: dragged out the stamp set and did it all over again!!)
I plan on posting a series of One Layer Cards later on so stay tuned!
Supplies:
Paper: A muse (wheat, gingham)
Ink: palette hybrid burnt umber
Stamps: A muse (birch trees, sun), Cornish Heritage Farms (Motivational Centers)
Accessories: Martha Stewart grass punch, pop dots, SU 1/2" circle punch
Thursday, June 3, 2010
One Layer Time...
One Layer Challenges are all over this month! Susan's One Layer Wednesday Challenge is to use repetition and A muse just posted their monthly challenge in the Lounge called "Taking off some layers"
As a result, I have a series of OLCs that I will be posting over the next week or so...I can't stop making them! Here is my card for Susan's challenge. I apologize for the slightly out of focus picture, I think the madeira paper in the background was messing up my camera somehow!!

Supplies:
Paper: A muse
Ink: Palette hybrid noir
Stamps: A muse (ladybird, hello)
Accessories: copics, black ribbon (unknown source), paper piercer, corner chomper
A muse has a wonderful selection of tiny stamps - this ladybug is one of my growing collection of these. I absolutely love the font of this sentiment...I have been using this stamp over and over since I got it - you may recognize it from last week's challenge! I think the font matches perfectly with the ladybugs' antennae this time...
I used a circle nestibility die to trace the circle, used my SAMJ to align the ladybugs around the inside of the circle, added my sentiment in the middle and pierced around the outer edge of the circle. I added the ribbon/bow and chomped off a few corners to soften the card. Hope you can find some time and some little stamps to join in on the challenge!!
As a result, I have a series of OLCs that I will be posting over the next week or so...I can't stop making them! Here is my card for Susan's challenge. I apologize for the slightly out of focus picture, I think the madeira paper in the background was messing up my camera somehow!!

Supplies:
Paper: A muse
Ink: Palette hybrid noir
Stamps: A muse (ladybird, hello)
Accessories: copics, black ribbon (unknown source), paper piercer, corner chomper
A muse has a wonderful selection of tiny stamps - this ladybug is one of my growing collection of these. I absolutely love the font of this sentiment...I have been using this stamp over and over since I got it - you may recognize it from last week's challenge! I think the font matches perfectly with the ladybugs' antennae this time...
I used a circle nestibility die to trace the circle, used my SAMJ to align the ladybugs around the inside of the circle, added my sentiment in the middle and pierced around the outer edge of the circle. I added the ribbon/bow and chomped off a few corners to soften the card. Hope you can find some time and some little stamps to join in on the challenge!!
Subscribe to:
Posts (Atom)

